Today I learned
Sharing our success and experience
Debugging Intellij IDEA Performance Issues
All of a sudden our work with the Intellij IDEA platform started to feel sluggish. Each code change caused delays that lasted multiple seconds. Observing the cpu activity we saw that it kept spiking at around 100% load. It was impossible to continue working like that so we proceeded to find out what exactly might be behind these massive spikes.
It turns out that Intellij IDEA has a pretty simple built in activity monitor (Activity Monitor under Help menu) to see what is going on at any given moment. When everything works smoothly the monitor shows something like this on our work computer:
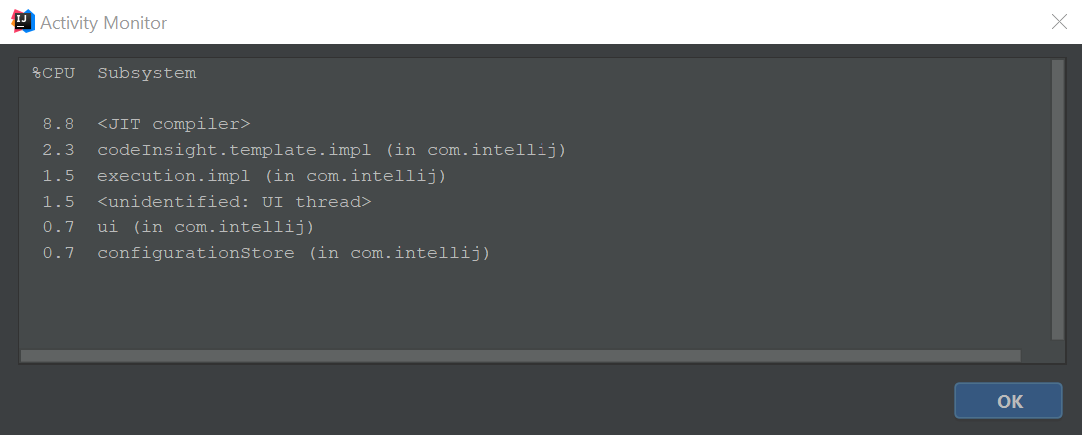
We saw some specific plugins taking most of the load at the moments the lag spikes occurred. After going through all the enabled plugins and removing those that were not needed anymore we restarted IDEA and it was working smooth again. It took just a small review of the work setup to get back up to optimal speed. If you don’t even notice anymore how sluggish your install of the program is or you feel like it could be faster then I suggest taking a few minutes to review the performance of your main working tool. It is definitely worth the time.
Oracle DB in Docker
Just in case anybody will need it in the future.
Note that Oracle no longer provides images of Oracle XE and if you build your own for 18c, it will be more bloated (8Gb) compared to Oracle Enterprise 12.x images (2Gb for slim)
Here is a script to run it:
#!/bin/bash

echo "Oracle container registry will now open in the browser."
echo "Please navigate to Database/Enterprise, then login, select language and accept terms and conditions before you can download Oracle images"
echo "This will be effective for the next 8 hours"
read -p "Press enter to continue"
xdg-open https://container-registry.oracle.com/

echo "Now login via Docker"
docker login container-registry.oracle.com

# add '-slim' if you don't need APEX, will save ~1.5Gb
docker run -d -it --name oracle-db -p 1521:1521 container-registry.oracle.com/database/enterprise:12.2.0.1
# default SYS/SYSTEM password is 'Oradoc_db1'
# connection string: jdbc:oracle:thin:@localhost:1521/ORCLPDB1.localdomain
Add sequence field to child table rows
I recently got a request from a customer to add the possibility to reorder
invoice rows manually. In order to achieve this on the database side
you need to add a new column which holds the sequence number of each
row. It is easy to add this column with ALTER TABLE statement. But
how do you assign a value for each existing row?
This is a simplified version of the invoice_rows table:
SELECT * FROM invoice_row;+------+------------+-----------+
| id | invoice_id | product |
+------+------------+-----------+
| 1 | 1 | Pencil |
| 2 | 1 | Book |
| 3 | 2 | Coffee |
| 4 | 2 | Sandwitch |
| 5 | 2 | Newspaper |
+------+------------+-----------+Now I add the column for the sequence number:
ALTER TABLE invoice_row ADD COLUMN sequence SMALLINT NOT NULL DEFAULT 0;This will result in all rows having sequence value 0. Now I want to have a growing sequence number for rows of each invoice so that the end result would be this:
SELECT * FROM invoice_row;+------+------------+-----------+----------+
| id | invoice_id | product | sequence |
+------+------------+-----------+----------+
| 1 | 1 | Pencil | 0 |
| 2 | 1 | Book | 1 |
| 3 | 2 | Coffee | 0 |
| 4 | 2 | Sandwitch | 1 |
| 5 | 2 | Newspaper | 2 |
+------+------------+-----------+----------+Is it possible to achieve this with a single update statement? I didn’t believe so initially but after some looking around found a very neat solution that works on MySQL.
MySQL supports variables in queries which you can change for each row. Here is an example:
SELECT
  @sequence := IF(@invoice = invoice_id, @sequence + 1, 0) sequence,
  @invoice := invoice_id invoice_id
FROM
  (SELECT @invoice := NULL, @sequence := 0) vars
  JOIN invoice_row
ORDER BY
  invoice_id, id;
+----------+------------+
| sequence | invoice_id |
+----------+------------+
| 0 | 1 |
| 1 | 1 |
| 0 | 2 |
| 1 | 2 |
| 2 | 2 |
+----------+------------+Start reading it from the FROM section: we set two variables to initial
values and join them with the table that we are actually querying.
Then look at the SELECT section: for each row we assign a new value to
both variables - the @sequence value is either incremented by one (if the
invoice_id is the same as previously) or reset to zero (if we have got a new
invoice_id). And @invoice get always the current invoice_id value.
The ORDER BY is important because you want all rows of the same invoice
to come together in the result. Otherwise the IF() for new @sequence
value would work incorrectly.
Once you have this, it can be used in an UPDATE statement to change all
rows:
UPDATE invoice_row ir,
  (SELECT
     @sequence := IF(@invoice = invoice_id, @sequence + 1, 0) sequence,
     id,
     @invoice := invoice_id
   FROM
     (SELECT @invoice := NULL, @sequence := 0) vars
     JOIN invoice_row
   ORDER BY invoice_id, id) t
SET ir.sequence=t.sequence WHERE ir.id=t.id;
Notice that I added id to the selected column list as this is how you
join the result with the actual updated table.
And now I have proper sequence value for each row!
Being able to do this with a single SQL statement means that I can easily add it as a database migration and it will be executed correctly in all environments.
Can two applications listen on the same port at the same time?
We are integrating with an external system which makes to HTTP POST
requests to an agreed URL. In order to learn about the exact format
of the data posted to us, we set up a primitive server written in
Python that logs the request body to a file and responds with a
dummy response.
We kept this server running for several days while we were building
our actual implementation. When we wanted to try out our implementation
we decided to ssh into the server where the requests where coming
to and port forward the traffic to our development machine.
(ssh -R 8090:localhost:8090 user@server)
We expected the port forwarding to fail initially because our primitive server is already listening on the same port. To our great surprise it didn’t fail. The forwarding was working just fine and we could test our implementation. We got disconnected from the server at some point and reconnected again when we needed to do more testing. To an even greater surprise - the primitive server had continued to receive requests after we had disconnected!
This was contrary to anything we had learned so far about sockets
so we decided to investigate deeper how is this possible. We used
netstat to see who is actually listening on that port:
$ sudo netstat -lp
...
tcp    0  0 *:8090             *:*           LISTEN      32256/python
...
tcp6   0  0 localhost:8090     [::]:*        LISTEN      4487/1
...
Aha!
The primitive server was written in Python and it seems that it binds to all IPv4 interfaces on that machine. However ssh seems to bind to IPv6 localhost interface where no-one is listening on that port.
The system we are integrating with was running on that same machine
and was configured to make requests with URL http://localhost:8090/.
It seems that there is a hierarchy in place where localhost:8090
is first picked up by the IPv6 stack and if no-one is listening
there then IPv4 gets a chance.
So when we had the ssh tunnel in place then IPv6 was used and we
got all the requests to our development machine. However when we
disconnected then IPv4 was used and our primitive logger server
handled the requests.
This is a nice feature of the network stack and something that could be utilized again in the future.
Using DBDeploy in Gradle
As you probably know, DBDeploy is a tool for easily and automatically installing database changes. And Gradle is a next-generation build automation tool (like Ant and Maven). The question is, how to use DBDeploy in Gradle scripts? It seems that DBdeploy doesn’t have Gradle plugin yet, nor has Gradle DBDeploy plugin. After some experimenting we found out that the easiest way is to reuse dbdeploy ant task. Let’s see the example below. Assuming that our project has “db” folder with all the sql scripts:
db
- create_changelog_table.sql
- 001_create_customer_table.sql
- 002_create_address_table.sql
- 003_etc…
build.gradle
We can create a Gradle build file containing 3 tasks:
build.gradle
project.ext {
  dbDriver = 'com.mysql.jdbc.Driver'
  dbUrl = 'jdbc:mysql:///codeborne?useUnicode=yes&characterEncoding=UTF-8'
  dbUsername = 'codeborne'
  dbPassword = 'codeborne'
}


task updateDatabase << {
  ant.taskdef(name: 'dbdeploy',
              classname: 'com.dbdeploy.AntTarget',
              classpath: configurations.compile.asPath)


  ant.dbdeploy(driver: dbDriver,
    url: dbUrl,
    userid: dbUsername,
    password: dbPassword,
    dir: 'db',
    dbms: 'mysql',
    undooutputfile: 'db/undo_last_change.sql')
}


task createChangelogTable << {
  ant.sql(driver: dbDriver,
          url: dbUrl,
          userid: dbUsername,
          password: dbPassword,
          encoding: 'UTF-8',
          classpath: configurations.compile.asPath) {
      fileset(file: 'db/create_changelog_table.sql')
  }
}


task undoLastChange << {
  ant.sql(driver: dbDriver,
          url: dbUrl,
          userid: dbUsername,
          password: dbPassword,
          encoding: 'UTF-8',
          classpath: configurations.compile.asPath) {
      fileset(file: 'db/undo_last_change.sql')
  }
}
Now we have 3 gradle tasks:
> gradle createChangelogTable
:createChangelogTable
BUILD SUCCESSFUL
> gradle updateDatabase
[ant:dbdeploy] dbdeploy 3.0M3
[ant:dbdeploy] Reading change scripts from directory /home/andrei/projects/blog-gradle-dbdeploy/db...
[ant:dbdeploy] Changes currently applied to database:
[ant:dbdeploy] 1..61
[ant:dbdeploy] Scripts available:
[ant:dbdeploy] 62..62
[ant:dbdeploy] To be applied:
[ant:dbdeploy] 62..62
[ant:dbdeploy] Applying #62: 062_migrate_currency_to_eur.sql...
[ant:dbdeploy] -> statement 1 of 5...
[ant:dbdeploy] -> statement 2 of 5...
[ant:dbdeploy] -> statement 3 of 5...
[ant:dbdeploy] -> statement 4 of 5...
[ant:dbdeploy] -> statement 5 of 5...
[ant:dbdeploy] Generating undo scripts...


BUILD SUCCESSFUL
> gradle undoLastChange
:undoLastChange
BUILD SUCCESSFUL
Now you must run “gradle createChangelogTable” once and then execute “gradle updateDatabase” so much as you wish, doing “gradle undoLastChange” to rollback the latest changes (until you committed you changes!) The bottom line is: Gradle has a very concise readable syntax for build scripts, DBDeploy is a simple and stable way for applying database changes. They just work fine together.Happy databasing!